
Lighting Tips
How to Install Recessed Lighting: Everything You Need to Know
How to Install Recessed Lighting is a common question among homeowners looking to upgrade their space with modern, streamlined illumination. Recessed lighting – also known as can lights or downlights – has become a favorite in contemporary interior design for its clean look and space-saving design. These fixtures sit flush with the ceiling, making them ideal for low ceilings, minimalist rooms, and creating a subtle yet effective ambient glow.
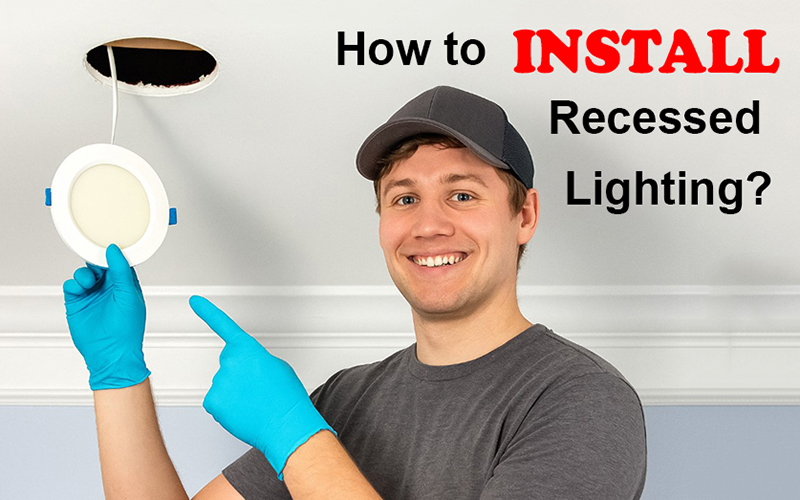
Whether you’re lighting up a dark hallway, accenting artwork, or adding warmth to your living room, recessed lights are both stylish and functional. And the best part? You don’t always need a professional electrician. With the right tools, thoughtful planning, and attention to safety, many homeowners can install recessed lighting themselves. In this step-by-step guide, we’ll show you exactly how to install recessed lighting – from selecting fixtures to cutting, wiring, and installing them with confidence.
What Is Recessed Lighting?
Recessed lighting refers to light fixtures that are installed into a hollow opening in the ceiling. When properly installed, they appear as if light is shining from a hole in the ceiling, concentrating light in a downward direction.
A typical recessed light fixture consists of three main parts:
- Housing: The metal can or enclosure that sits inside the ceiling and holds the electrical components.
- Trim: The visible part that frames the bulb and gives the light its finished look.
- Bulb or LED module: The light source itself, which can be halogen, LED, or incandescent.
There are two main types of housing to consider:
- New Construction Housings: Designed for installation before the ceiling is finished, usually during a renovation or new build.
- Remodel Housings: Meant for retrofitting into existing ceilings with minimal damage.
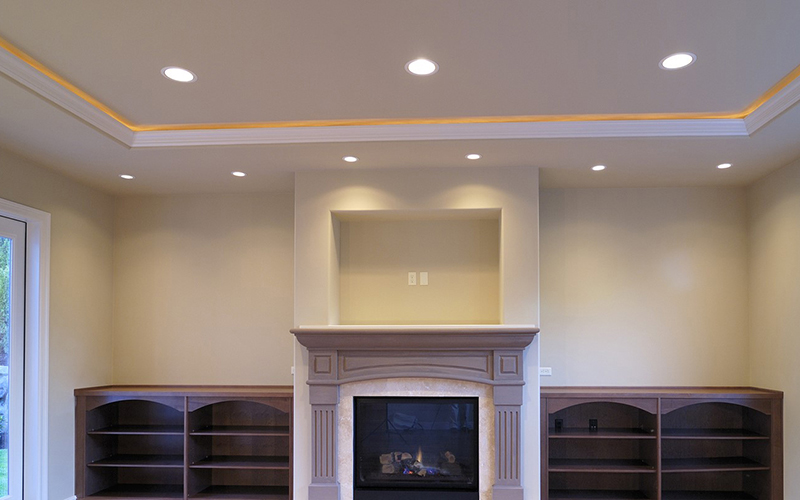
Recessed lighting works well in many settings:
- Living rooms for ambient or accent lighting
- Kitchens for task lighting over counters or islands
- Hallways and staircases for safety
- Bathrooms (with wet-rated fixtures)
- Home offices and basements
With the right setup, recessed lighting can dramatically improve your home’s functionality and aesthetic without taking up visual space.
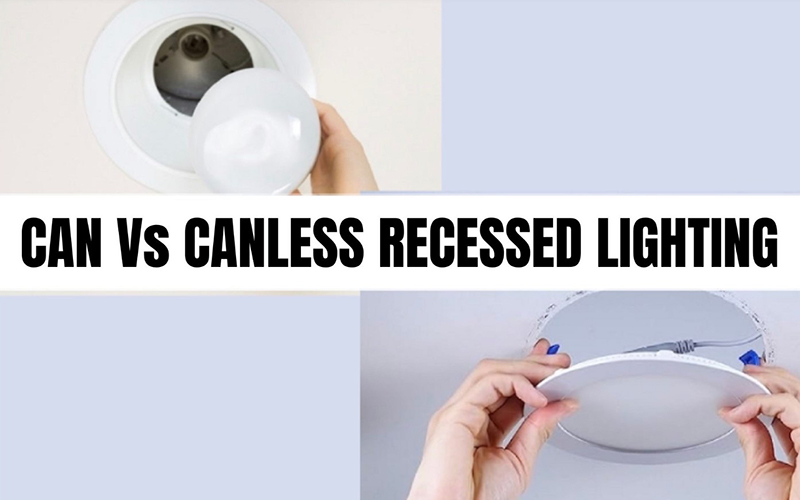
Can Lights vs Recessed Lights – What’s the Difference?
“Can lights” and “recessed lights” are often used interchangeably – they refer to the same type of lighting fixture installed flush into the ceiling for a clean, modern appearance. The term “can light” comes from the cylindrical, can-like metal housing that holds the light and wiring, which is recessed into the ceiling. “Recessed light” simply describes the way the fixture sits inside the ceiling, rather than protruding.
As lighting technology evolves, another popular option has emerged: canless recessed lighting. Unlike traditional can lights that require a bulky metal housing, canless recessed lights are ultra-slim, all-in-one units with built-in junction boxes and integrated LED modules. This makes them much easier to install – especially in remodel projects, tight spaces, or ceilings with limited depth.
Choosing between can lights and canless recessed lights depends on your ceiling type, project scope, and preference for installation ease. Here’s a side-by-side comparison to help you decide:
Comparison Table: Can Lights vs Canless Recessed Lights
| Feature | Can Lights | Canless Recessed Lights |
|---|---|---|
| Housing Required | Yes – separate “can” housing needed | No – integrated, all-in-one design |
| Installation Type | Ideal for new construction or when attic access is available | Perfect for remodels and tight ceiling spaces |
| Ceiling Clearance Needed | Requires more depth (typically 5–7 inches) | Ultra-slim, needs minimal clearance (1–2 inches) |
| Wiring Complexity | More wiring steps; junction box usually separate | Simplified – junction box is built-in |
| Fixture Replacement | Bulbs and trim often replaceable separately | All-in-one fixture; may need full unit replacement |
| Cost (Initial) | Lower per unit, but may need extra components | Slightly higher per unit, but includes everything |
| Energy Efficiency | Varies (depends on bulb type used) | Typically LED-integrated and highly energy-efficient |
| Best For | Attics, drop ceilings, long-term setups | Finished ceilings, modern renovations, DIY installations |
Whether you’re learning how to install can lights, researching LED recessed lighting installation, or exploring modern options like canless recessed lighting, understanding these differences ensures you choose the right fixture for your home. Both offer clean, unobtrusive lighting – but canless systems are often preferred for speed, space-saving, and simplicity, especially in renovations or DIY settings.
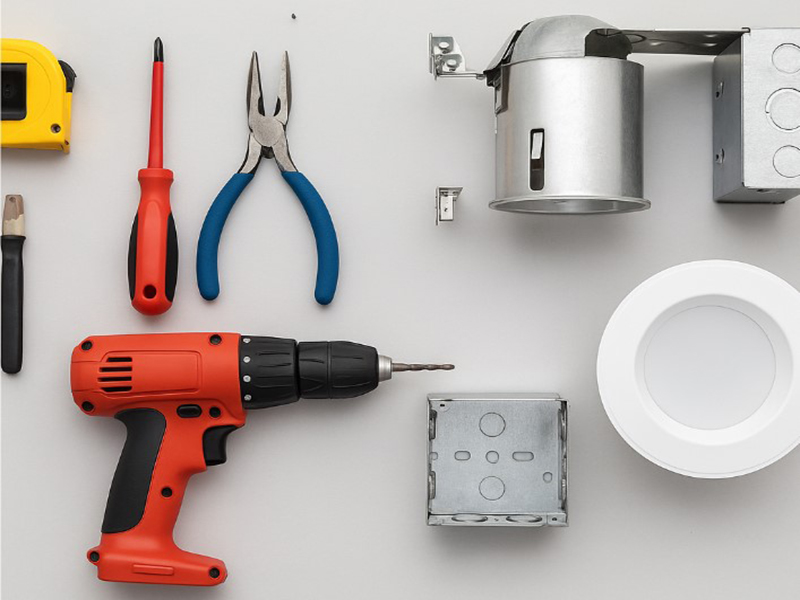
Tools and Materials Needed
Before you cut into any ceiling, it’s essential to gather all the right tools and materials. A well-prepared workspace reduces installation time and helps prevent mistakes or safety hazards.
Essential tools for installing recessed lights
- Stud Finder – Locates joists or obstacles behind the ceiling.
- Hole Saw or Drywall Saw – Cuts clean, accurate holes for the light housing.
- Tape Measure & Pencil – For precise placement and marking.
- Voltage Tester – Ensures the power is off before touching any wires.
- Wire Strippers – Removes insulation from wires cleanly.
- Drill & Drill Bits – For creating pathways through joists and framing if needed.
- Screwdriver (Flathead & Phillips) – For electrical connections and fixture mounting.
- Ladder – To safely reach ceiling height.
Materials used for installing recessed lights
- Recessed Light Kits – Choose between IC-rated or non-IC depending on insulation contact.
- Compatible Light Bulbs or LED Modules – Make sure the wattage and size match the housing.
- Electrical Wire (Romex or NM-B, typically 14/2 or 12/2) – Use the correct gauge based on your circuit.
- Wire Nuts or Push-in Connectors – For safe electrical connections.
- Cable Clamps or Staples – To secure wiring along framing.
- Junction Boxes (if not integrated) – Needed if housing doesn’t have built-in wiring compartment.
- Safety Gear – Gloves, safety glasses, and dust mask if working with drywall.
Tip: Use IC-rated and airtight housings for areas with insulation or where air leakage needs to be minimized, such as attics or energy-efficient homes.
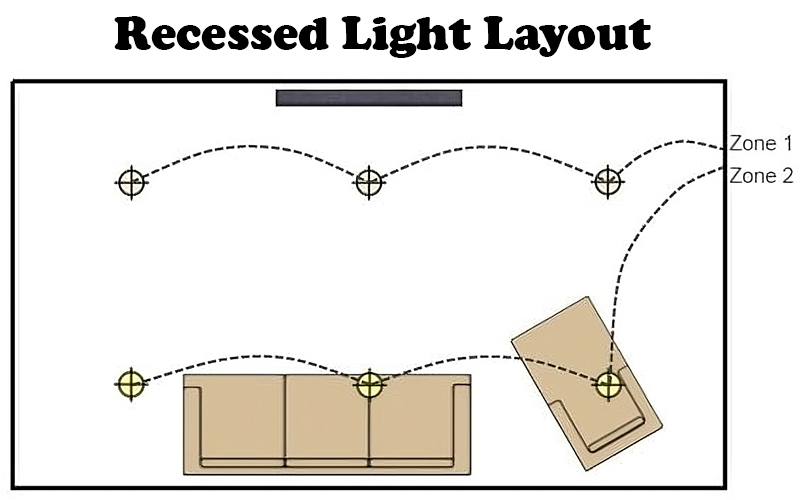
Planning Your Recessed Light Layout
Installing recessed lighting isn’t just about picking a spot and cutting a hole – you need a thoughtful lighting plan that balances aesthetics, functionality, and safety.
How Many Recessed Lights Do I Need?
To determine how many recessed lights you need, a common rule is one light for every 4 to 6 square feet of ceiling space. For general lighting, divide the room’s square footage by the recommended coverage per fixture. Also consider ceiling height, light beam angle, and the room’s function.
Use a lighting layout plan to ensure even illumination without dark spots or glare. Keep at least 2-3 feet from walls to avoid harsh shadows.
Key Layout Considerations for Recessed Lighting
- Room Purpose: Task lighting for kitchens or reading nooks, ambient lighting for living rooms.
- Focal Points: Highlight kitchen islands, artwork, or furniture.
- Symmetry & Balance: Maintain even spacing and alignment with room geometry.
- Avoid Obstructions: Use a stud finder to locate joists, ductwork, or plumbing.
- Existing Wiring: Plan wiring routes to minimize drywall cuts and comply with code.
Planning for Recessed Lights Zones
Break the room into zones:
- Overhead lighting zone
- Accent zone (e.g., above fireplace or bookshelves)
- Task zone (e.g., countertops, desks)
Planning ahead saves time and avoids costly rework once installation begins.
Electrical Safety First
Before you begin any wiring work, safety must be your top priority. Working with electricity can be dangerous if you’re unprepared or careless.
Turn Off the Power
- Go to your main electrical panel and shut off the circuit breaker for the area you’ll be working on.
- Use a voltage tester to confirm there is no live power at the switch or ceiling outlet box before proceeding.
Use the Right Equipment and Protection
- Wear rubber-soled shoes and work on a non-conductive ladder (fiberglass is best).
- Avoid working in damp environments unless the fixture is wet-rated and your power source is protected by a GFCI (Ground Fault Circuit Interrupter).
Check Local Electrical Codes
- Some regions require a permit or inspection for new electrical installations.
- Check if your work complies with NEC (National Electrical Code) or local regulations, especially regarding insulation clearance, junction box use, and fixture rating.
When in Doubt, Hire a Licensed Electrician
While many homeowners can handle a simple installation, you should hire a professional if:
- You need to install a new circuit.
- Your panel box is full or outdated.
- You feel unsure about proper grounding or wire routing.
Never take shortcuts when dealing with electricity. A few extra minutes spent on safety can prevent fire hazards, injuries, or costly repairs.

Step-by-Step Recessed Lighting Installation Process
Installing recessed lighting requires precision, preparation, and a firm grasp of basic wiring. Whether you’re planning to add recessed lighting in an existing ceiling or a new construction project, this recessed lighting guide will walk you through the essential steps.
Installing recessed lighting requires careful planning, attention to detail, and a solid understanding of basic electrical work. Whether you’re upgrading an existing ceiling or working on a new construction project, this recessed lighting guide will walk you through each critical step – from layout and fixture selection to cutting, mounting, and most importantly, how to wire recessed lighting safely and efficiently. With the right tools and preparation, you can transform any room with clean, modern illumination.
Important: Make sure you’ve turned off the power at the circuit breaker before beginning, and verify it with a voltage tester.
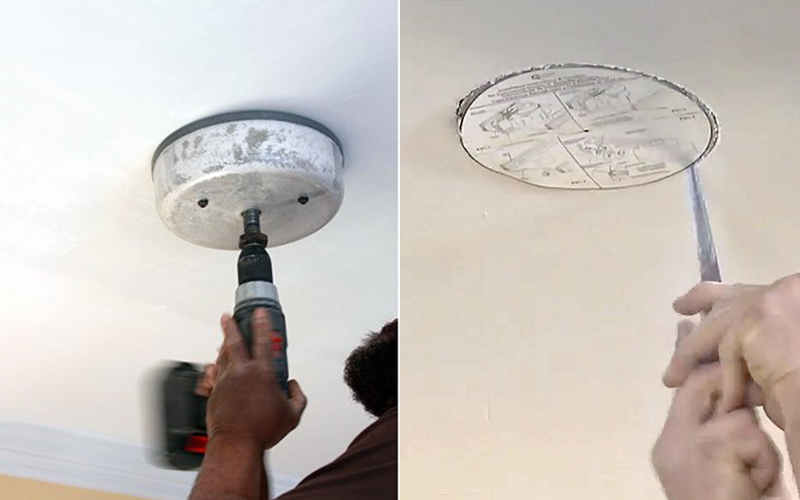
1. Mark the Locations and Cut the Holes
Step 1: Determine Final Fixture Placement
- Use your lighting plan (from section 4) and measure exact positions.
- Use the paper template (usually included with the fixture) to trace circles on the ceiling.
Step 2: Check for Obstructions
- Use a stud finder to detect joists, HVAC ducts, or plumbing.
- Drill a small pilot hole and inspect with a flashlight or inspection camera if unsure.
Step 3: Cut the Ceiling Openings
- Use a hole saw (sized to your fixture) or a drywall saw for manual cutting.
- Wear a dust mask to protect yourself from drywall particles.
Tip: Cut slowly and cleanly to avoid damaging the surrounding ceiling.
2. Run Electrical Wiring
Step 1: Plan Your Wiring Path
- Determine whether you’re powering the lights from an existing switch, or installing a new one.
- Decide whether the power enters from the switch or directly to the first light (loop wiring).
Step 2: Feed the Cable
- Use Romex (NM-B) 14/2 or 12/2 cable depending on the breaker and circuit load.
- Drill through joists or fish the wire through ceiling cavities as needed.
- Leave about 6–8 inches of wire hanging through each hole for easy connections.
Step 3: Secure the Wire
- Use cable clamps or staples every 4.5 feet and within 12 inches of junction boxes, per NEC code.
- Ensure wires aren’t pinched or touching sharp metal edges.
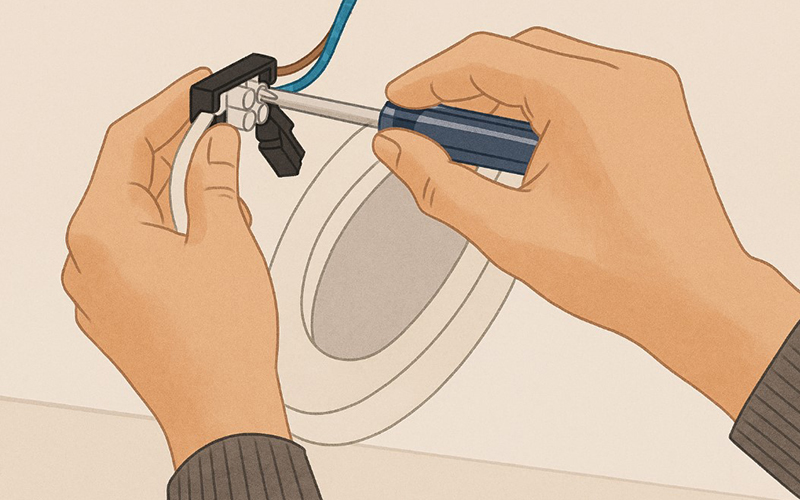
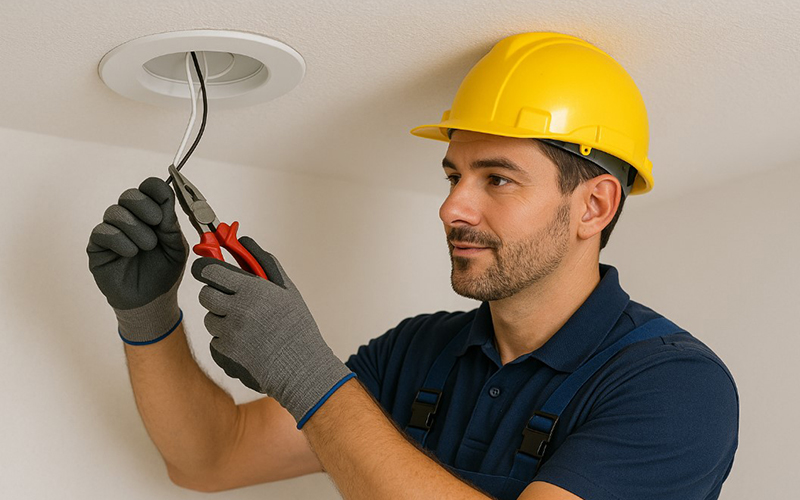
3. Connect the Wires to the Fixture
Step 1: Open the Fixture’s Junction Box
Most recessed light housings come with a built-in junction box. Carefully open it to prepare for wiring.
Step 2: Wiring Recessed Lights – Match the Wires
To begin wiring recessed lights, strip about 3/4 inch of insulation from the ends of each wire. Connect the wires by color:
- Black (hot) to black
- White (neutral) to white
- Ground (bare copper or green) to the grounding screw or wire on the fixture
Secure all connections with UL-listed wire nuts or push-in connectors for safety.
Step 3: Close the Junction Box
Neatly fold the wires inside the junction box and securely fasten the cover.
Pro Tip: If you’re using LED retrofit kits, many models include push connectors, eliminating the need for manual wiring recessed lights – always check your product’s installation guide.
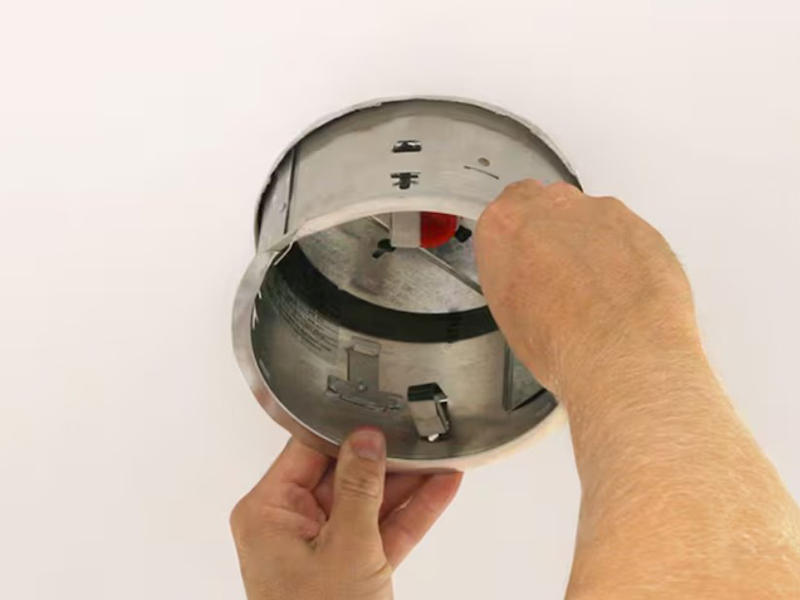
4. Insert the Recessed Housing into the Ceiling
For Remodel Housings (Retrofit Installation):
- Squeeze the torsion clips or spring arms, then push the housing into the ceiling until it clicks or locks in place.
- Adjust the trim and ensure it sits flush with the drywall.
For New Construction Housings:
- Secure the housing to ceiling joists or hangers before the drywall goes up.
- Ensure housing height is even and consistent throughout the room.
IC-rated vs. Non-IC-rated:
- IC-rated housings can safely touch insulation.
- Non-IC-rated must maintain at least 3 inches of clearance from insulation.
5. Install the Trim and Bulb
Step 1: Attach the Trim Ring
- Depending on the model, trim rings may snap in, twist-lock, or be secured with springs.
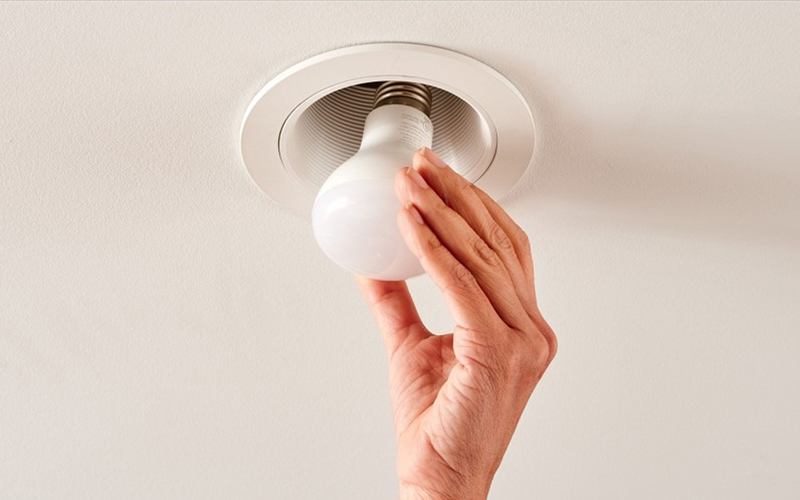
Step 2: Insert the Bulb or LED Module
- Use only compatible bulbs (check wattage, voltage, and type).
- If using an LED retrofit, plug in the quick-connect cable and push the module into place.
Step 3: Test the Light
- Restore power at the breaker and test the switch.
- Confirm the light functions properly and that no flickering or loose connections occur.
Tip: Use dimmable LED bulbs and compatible dimmer switches to fine-tune your lighting ambiance.
Common Mistakes to Avoid During Recessed Light Installation
Even experienced DIYers can make costly or dangerous errors when installing recessed lighting. Here are the most common mistakes and how to avoid them:
Incorrect Placement
Placing recessed lights too close to walls or furniture can cause uneven lighting and harsh shadows. Always follow spacing guidelines based on ceiling height and lighting purpose.
Avoid placing fixtures closer than 2–3 feet from the wall.
Using Non-IC-Rated Housings Near Insulation
Non-IC (Insulation Contact) housings can overheat if they come into contact with insulation, increasing the risk of fire. Always use IC-rated fixtures in insulated ceilings or attics.
Overloading the Circuit
Adding too many lights to an existing circuit can cause breakers to trip or pose fire hazards. Always calculate the total wattage on a circuit and ensure it doesn’t exceed 80% of the rated load.
Cutting Without Checking Behind the Ceiling
Blindly cutting into the ceiling without checking for joists, pipes, or wiring can damage your home and create expensive repairs. Always probe first with a stud finder or inspection hole.
Improper Wiring Connections
Loose or exposed wire connections are a fire hazard. Ensure all wires are stripped to the correct length, securely twisted or pushed into connectors, and enclosed in a junction box.
Remember: neat wiring is safe wiring.

When to Call a Professional to Install Recessed Light
While recessed lighting installation can be a manageable DIY project, there are situations when it’s smarter – and safer – to hire a licensed electrician.
When You Need to Add a New Circuit?
If your panel box is full or you need to run a completely new line, this requires technical knowledge, code compliance, and safety precautions that go beyond DIY capabilities.
If You Have Limited Access to the Ceiling
Vaulted ceilings, plaster ceilings, or structures with complex framing can make running wires nearly impossible without the right tools and techniques.
When You’re Unsure About Code Compliance
Electrical codes vary by state and city. A licensed electrician will ensure that:
- Fixtures are properly rated for the environment (e.g., wet locations in bathrooms)
- Wiring is correctly routed and secured
- Circuit capacity is not exceeded
Signs You Shouldn’t Proceed Alone
- You feel unsure or nervous about working with electricity
- There are signs of older or damaged wiring
- You’re combining lights with smart home automation or dimmers you don’t understand
Investing in a professional could save you money in the long run by avoiding costly mistakes or rework.
Maintenance Tips for Recessed Lighting
Once your recessed lighting is installed, routine maintenance is key to ensuring long-lasting performance, consistent brightness, and household safety. Whether you’re planning future recessed lighting placement in new rooms or simply looking to keep your existing fixtures in top shape, these practical tips will help extend the life of your setup.
Clean the Trim and Lenses Regularly
Over time, dust, cobwebs, and debris naturally collect around the trim and lenses of recessed lights. This buildup can reduce light output, distort color temperature, and even contribute to overheating.
- Use a soft microfiber cloth or a static duster to clean the trim every 2–3 months.
- Avoid harsh chemicals – use a slightly damp cloth if needed and dry immediately afterward.
- Make sure the light is turned off and the bulb is cool before cleaning.
A clean fixture not only looks better but also provides brighter, more even lighting.
Replacing Recessed Lighting Bulbs Safely
Knowing how to replace a recessed light is essential for both maintenance and troubleshooting. Whether you’re dealing with a burnt-out bulb or upgrading to LED, always prioritize safety.
- Turn off power at the breaker before touching any fixture.
- For deep-set recessed trims, use a suction cup tool to gently remove the bulb without damaging the trim or ceiling.
- When replacing recessed lights, always match the bulb size, type, and wattage recommended by the manufacturer.
- Consider upgrading to dimmable LED bulbs, which run cooler and last significantly longer.
If your light continues to flicker or go out shortly after replacing the bulb, inspect the socket for wear or corrosion – it may be time to replace the housing.
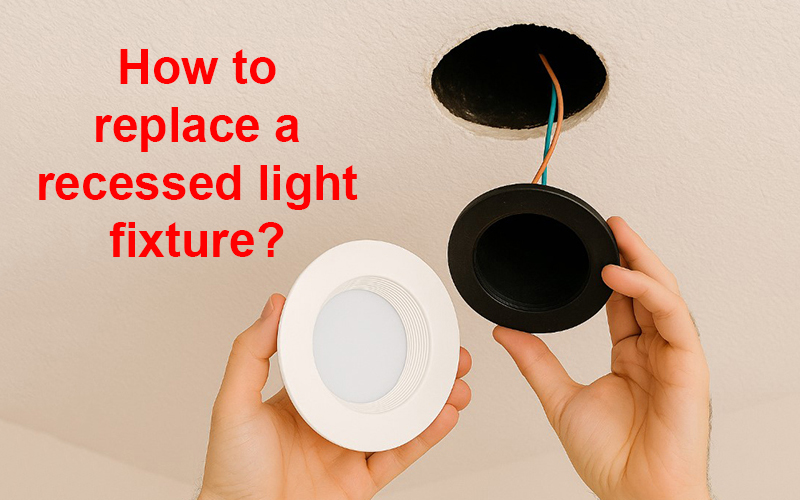
Replacing Recessed Lighting Fixtures
Sometimes you’ll need more than a new bulb – you’ll need to consider replacing recessed lighting fixtures entirely. This can happen due to outdated trims, broken housings, or simply to improve energy efficiency.
Here’s how to replace a recessed light fixture:
- Shut off power to the circuit at the breaker panel.
- Remove the old trim and bulb.
- Disconnect the fixture from the electrical box.
- Install the new fixture housing (compatible with your ceiling depth and insulation).
- Reconnect wiring, install the trim and bulb, and restore power.
Tip: If you’re updating your recessed lighting placement as part of a room redesign, take this opportunity to correct spacing, avoid shadows, and improve lighting coverage.
Check for Loose Trims or Flickering Lights
A common issue with recessed lights is flickering, which is often caused by:
- Loose housing or trim clips
- Incompatible dimmer switches
- Poor wiring connections
- Overheated or incorrect bulb type
If your fixture seems loose or unstable:
- Turn off the power.
- Inspect the mounting clips or brackets.
- Tighten screws and connections as needed.
Monitor for Overheating
If the area around your recessed light feels unusually hot, it could signal:
- A bulb with too high wattage
- Blocked airflow around the fixture
- Non-IC-rated housing installed near insulation
Solutions:
- Switch to LED bulbs, which emit less heat.
- Check that the fixture is IC-rated if installed near insulation.
- Avoid covering the housing with insulation unless it’s certified safe.
By staying proactive with maintenance and understanding how to replace a recessed light properly, you’ll not only preserve the life of your fixtures – but also maintain a safe, energy-efficient, and beautifully lit space.
FAQs (Frequently Asked Questions)
1. Placement & Installation Basics
Q1: Where to put recessed lighting?
Recessed lighting should be placed 2 to 3 feet away from walls and spaced evenly across the ceiling, typically 4 to 6 feet apart, depending on ceiling height and the lighting purpose.
Q2: Where should you not put recessed lights?
Avoid placing recessed lights:
- Directly over ceiling fans (causes strobe effect)
- In areas with insulation unless using IC-rated fixtures
- In shallow ceilings where housing won’t fit
- Too close to walls or corners, which can cause uneven lighting or glare
Q3: Can you put a downlight above a shower?
Yes, but only if it’s wet-rated or shower-rated. Also, it must be installed on a GFCI-protected circuit. Make sure both the housing and trim are certified for wet locations.
2. DIY vs. Professional Installation
Q1: Can I install recessed lighting myself?
Yes, if you’re comfortable with basic electrical work and have the right tools. Many homeowners install recessed lighting on their own – especially remodel versions – but if you need to add new circuits or run complex wiring, consider hiring an electrician.
Q2: How to install led recessed lighting in existing ceiling?
For LED recessed lighting installation in an existing ceiling, use remodel housings that can be inserted from below. Turn off the power, mark your layout, and cut holes using the template. Run wires through the ceiling with fish tape or a flexible drill bit, then follow a LED recessed lighting wiring diagram to make safe connections inside the fixture’s built-in junction box. Secure the housing with clips and attach the LED trim. Always follow local electrical codes or consult a licensed electrician.
Q3: How to install recessed lighting in an existing light fixture?
To install recessed lighting in an existing light fixture, use an LED recessed lighting retrofit kit. First, turn off the power and remove the old fixture. Screw the adapter into the existing socket, connect the ground wire if needed, and snap the new LED trim into place. No new wiring is usually required, but always check compatibility and follow the LED recessed lighting wiring diagram provided with the kit.
Q3: How to install recessed lighting without attic access?
You can install recessed lighting in a finished ceiling without attic access by using remodel housings. These are designed to be inserted from below the ceiling and secured with spring clips. Use a fish tape or flexible drill bit to run wiring through ceiling cavities between joists.
Q4: Are recessed lights easy to install?
Recessed lights are moderately easy to install for someone with DIY experience. Installing them in drywall with no insulation is relatively simple; however, ceilings with insulation, joists, or no attic access make the job more challenging.
3. Value & Cost Considerations
Q5: Do recessed lights add value to home?
Yes. Recessed lighting is considered a modern upgrade that improves ambiance and makes rooms appear more open and elegant – often increasing a home’s perceived value in real estate markets.
Q6: Why is recessed lighting so expensive?
Recessed lighting may seem expensive due to the cost of fixtures, professional installation, and cutting into finished ceilings. However, LED recessed lights are long-lasting and energy-efficient, which saves money over time.
4. How Many Lights You Need
Q7: How many 6-inch recessed lights do I need?
For general lighting, use this rule:
One 6-inch light for every 5–6 square feet of ceiling space.
So in a 12×12 room (144 sq ft), you’d need about 6 to 8 lights, depending on ceiling height and desired brightness.
Q8: How far apart should 4-inch recessed lights be?
For 4-inch recessed lights, spacing should be 4 to 5 feet apart, and 2 to 3 feet from walls. This avoids hot spots or uneven shadows.
Q9: How many recessed lights do I need for a 10×10 room?
A 10×10 room (100 sq ft) typically requires 4 to 6 recessed lights, depending on fixture size and brightness. For general lighting, aim for even spacing with a center layout.
Q10: How many recessed lights do I need for a 12×12 room?
For a 12×12 room (144 sq ft), plan for 6 to 8 LED recessed lights spaced evenly. Use dimmers for adjustable brightness in multi-use spaces.
5. Electrical Load & Circuit Limits
Q11: How many LED recessed lights on a 15 amp circuit?
It depends on wattage per fixture.
For 10W LED lights: 15-amp x 120V = 1800 watts → ~180 LED watts total
That means you can run up to 18 LED lights at 10W each on a 15-amp circuit.
Q2: How many recessed lights on a 15 amp circuit?
For traditional halogen bulbs (65W), a 15-amp circuit can safely handle up to 10–12 fixtures. Always leave a 20% safety margin, and check total wattage across all devices on the circuit.
6. Smart Lighting & Remote Options
Q1: Can you use remote control recessed lights?
Yes. Many modern recessed lighting systems support remote control via handheld remotes or smartphone apps. These are great for hard-to-reach ceilings or mood lighting setups.
Q16: Are there color changing recessed lights with remote?
Absolutely. Smart LED recessed lights offer color-changing features with remote control or voice assistant support (Alexa, Google). They allow you to shift between warm, cool, or RGB colors with a tap.
7. Bulb Type & Recommendations
Q17: What type of light bulb should I use for recessed lighting?
LED bulbs are the best choice – energy-efficient, cool-running, and long-lasting. Look for dimmable, recessed-rated LEDs with the right beam angle and color temperature for your room.
Conclusion: Ready to Transform Your Space?
Installing recessed lighting can dramatically enhance your home’s look, feel, and functionality. Whether you’re aiming for modern minimalism or layered ambient lighting, these fixtures provide sleek illumination without cluttering your ceiling.
With the right tools, knowledge, and planning, a confident DIYer can handle the job safely. But if you’re ever in doubt, calling a licensed electrician ensures your home stays safe and up to code.
🌟 Looking for high-quality recessed light fixtures with natural charm?
At VietshopDesign, we offer a curated collection of handcrafted lighting solutions – including bamboo, rattan, and woven pendant lights that pair beautifully with recessed setups. Whether you’re upgrading your kitchen, bathroom, or cozy reading nook, our lights add warmth, texture, and artisan appeal to any space.
👉 Visit vietshopdesign.com to explore our latest lighting collections and find the perfect piece for your home.
Need help choosing the right fixture? Contact our teamwe’re here to help you light up your vision.


Unlock VIP Perks
Join as a priority member to receive gifts and be the first to access exclusive deals, our newest collections, and more...
Read More
10 Best Bamboo Rattan Furniture Ideas for your Home
In a world increasingly focused on sustainability and wellness, bamboo rattan furniture has found its [...]
Jul
Recessed Lighting Layout Guide: Room-by-Room Tips & Ideas
Whether you’re remodeling a kitchen, updating your bathroom, or designing a cozy basement retreat, a [...]
Jun
Recessed Lighting Installation Cost in 2025: Money-Saving Tips
Recessed lighting installation cost is one of the first things homeowners consider when planning to [...]
Jun
How to Change Recessed Lighting: Step-by-Step Guide
Recessed lighting – often referred to as can lights, pot lights, or downlights – is [...]
Jun
How Many Recessed Lights Do I Need? Expert Guide to Perfect Lighting Layout
One of the most common questions homeowners ask when planning lighting is: “How many recessed [...]
Jun
How to Install Recessed Lighting: Everything You Need to Know
How to Install Recessed Lighting is a common question among homeowners looking to upgrade their [...]
Jun
Best Bathroom Pendant Light Ideas to Elevate Your Space
When it comes to bathroom design, lighting plays a crucial role in setting the mood, [...]
Jun
Best Hotel Lighting Ideas That Will Wow Your Guests
Lighting plays a vital role in shaping the guest experience in any hospitality setting. From [...]
Jun
Product Collection
Rattan Pendant Light
86 Products
Bamboo Pendant Light
56 Products
Fabric Pendant Light
44 Products
Wood Pendant Light
9 Products
Rope Pendant Light
8 Products
Rattan Table Lamp
6 Products
Wabi Sabi Pendant Light
39 Products
Rattan Wall Sconce
5 Products