
Lighting Ideas, Lighting Tips
Recessed Lighting Layout Guide: Room-by-Room Tips & Ideas
Whether you’re remodeling a kitchen, updating your bathroom, or designing a cozy basement retreat, a smart recessed lighting layout can completely transform how your space looks and feels. Get it wrong, and you’ll be dealing with harsh glare, dim corners, or a room that just feels… off. But get it right? You’ll enjoy clean, even lighting that makes every room more functional, stylish, and inviting. So, how to layout recessed lighting?
In this guide, we’ll walk you through everything you need to know about planning a perfect recessed lighting layout-room by room.
What Affects a Recessed Lighting Layout?
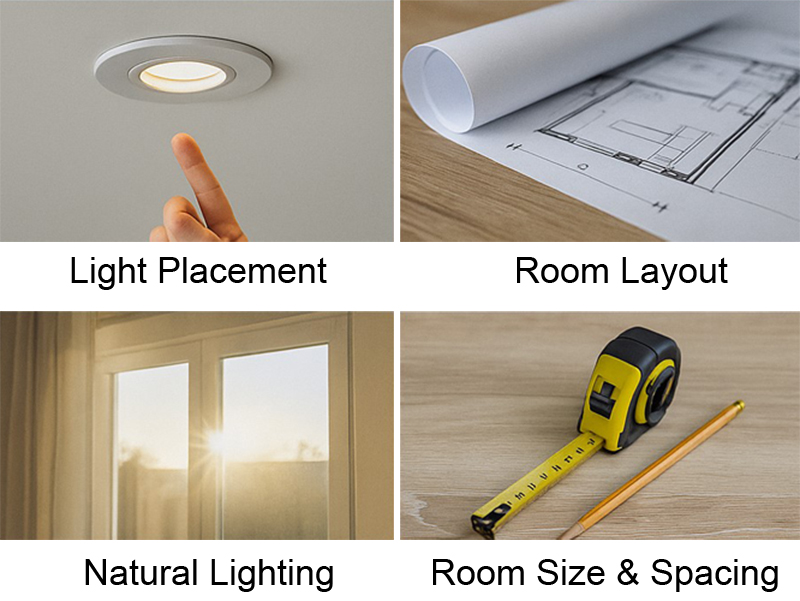
Before diving into fixtures and spacing, it’s important to understand the key factors that influence your lighting layout. Every room is different, and what works in a living room may not suit a small bathroom or open-concept kitchen.
Here’s what to consider:
Room Function
Are you trying to light a space for cooking, relaxing, reading, or working?
- A kitchen needs strong task lighting.
- A living room may need layered lighting (ambient + accent).
- A bathroom vanity needs targeted light to avoid shadows.
Room Size and Shape
- Large, rectangular rooms require more lights with careful spacing to avoid dark spots.
- Small rooms (like powder baths or home offices) need fewer, but properly placed, fixtures.
Ceiling Height and Type
- An 8-foot ceiling may call for different spacing than a vaulted or 10-foot ceiling.
- Sloped ceilings may benefit from adjustable or gimbal fixtures.
- For basements with low ceilings, canless LED fixtures are often best.
Natural Light
How much sunlight enters the room during the day? If your space gets lots of daylight, you might need fewer recessed lights or dimmable options to balance lighting levels.
Lighting Purpose
Most recessed lighting layouts fall into three categories:
- Ambient – General illumination for the entire room.
- Task – Focused light over countertops, vanities, desks, or reading nooks.
- Accent – Highlighting artwork, shelves, or architectural features.
How to Lay Out Recessed Lighting? Basics Rules
Once you’ve thought through the room’s purpose and conditions, it’s time to plan the layout itself. While each room has unique needs, these foundational rules apply to nearly every situation:
How Far Apart Should Recessed Lights Be?
One of the most common questions is: How many recessed lights do I need, and how should I space them?
A great rule of thumb:
Divide your ceiling height by 2 to determine the spacing between lights.
- 8-foot ceiling → lights spaced about 4 feet apart
- 10-foot ceiling → lights spaced about 5 feet apart
This ensures overlapping beams of light for even coverage without dark spots or glare. For lower ceilings (like in basements), you may want to reduce the distance slightly for brighter coverage.
Avoid the “Wall Glow” Trap
Installing recessed lights too close to the wall creates uneven lighting and unattractive shadows – especially on textured walls.
- Keep fixtures at least 2 to 3 feet away from walls.
- If you want to light up a wall or feature, use directional (gimbal) recessed lights aimed at the surface.
Recessed lighting placement in bathroom is especially important, smooth lighting around mirrors and tiles helps create a clean, luxurious look.
Balance Light Across the Room
Good lighting isn’t just about brightness – it’s about balance.
- For open layouts (like kitchen/living combos), carry your spacing grid across both spaces for visual flow.
- In long rectangular rooms or hallways, consider rows of lights spaced evenly to eliminate uneven shadows.
About placement of can lights in kitchen, this also means aligning lights with cabinetry and appliances so you’re lighting the areas where you actually work – not just the middle of the room.
Use the Right Beam Spread and Lumens
- Choose beam angles between 40°–60° for general lighting
- Narrower beams (25°–35°) are great for spotlighting or accent areas
- Aim for 600–800 lumens per fixture in standard rooms, more for task-heavy zones like kitchens or bathrooms
Adjust brightness with dimmers, especially in multipurpose rooms like the living room or dining room where ambiance matters.
Plan Your Switches and Zones
Divide your lighting into logical zones – don’t just connect all your recessed lights to one switch.
For example:
- Kitchen task lights on one circuit
- Ambient ceiling lights on another
- Accent lighting on a third, with dimmers for flexibility
This approach gives you control and comfort, and also saves energy.
By focusing on spacing, wall distance, beam direction, and functional zones, you’ll create a recessed lighting layout that not only looks great – but works beautifully for how you live.
Layout Ideas for Each Room Type
Each room in your home has its own lighting needs – and that means each one deserves its own recessed lighting layout. Below are practical layout suggestions based on the room type, including tips for placement, spacing, and functionality.
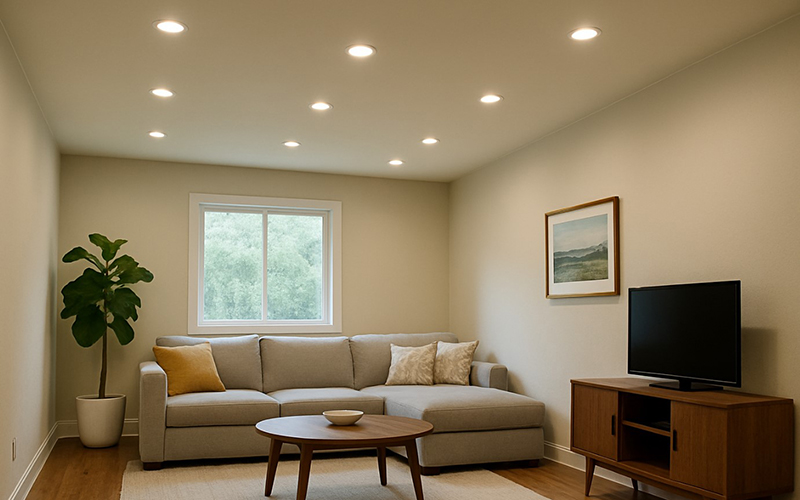
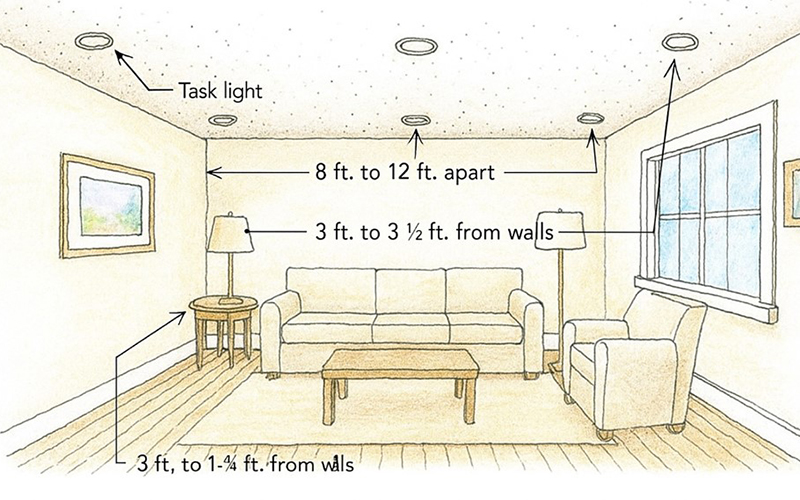
Living Room Recessed Lighting Layout
The living room is where you relax, watch TV, entertain guests, or read. That means it benefits from a mix of ambient and accent lighting.
- Place lights evenly spaced across the ceiling to provide soft general lighting.
- Avoid placing lights directly over the TV or seating area, which can create glare.
- For living room pot light layout, use a grid or rectangular pattern, especially in large or open-plan spaces.
- Want to highlight artwork or a feature wall? Add adjustable recessed lights (also called gimbal lights) to aim light where you want it.
💡 Tip: A dimmer switch is a must-have in the living room to control mood lighting throughout the day.
Bedroom Recessed Lighting Layout
In the bedroom, lighting should be calm, cozy, and dimmable.
- Recessed lights should provide gentle ambient lighting, ideally with warm white (2700–3000K) bulbs.
- Avoid putting lights directly over the bed – it’s both visually harsh and functionally awkward.
- Instead, space them evenly across the room, about 4–5 feet apart, depending on ceiling height.
- Want to read in bed? Use wall sconces or table lamps for task lighting instead of recessed fixtures.
The goal is to create a relaxing atmosphere without over-lighting the space.
Bathroom Recessed Lighting Layout
Bathrooms require a delicate balance between bright task lighting and soft ambient lighting.
- For general lighting, use 2–4 recessed lights depending on bathroom size.
- In small bathrooms, place one centered light and one near the vanity – just enough to brighten the space without overloading it.
- For recessed lighting placement over bathroom vanity, install two fixtures placed about 3 feet apart and slightly forward of the mirror.
- Make sure all bathroom fixtures are rated for damp or wet environments.
Use bright, color-accurate bulbs (like 4000K daylight) for tasks like shaving or applying makeup.
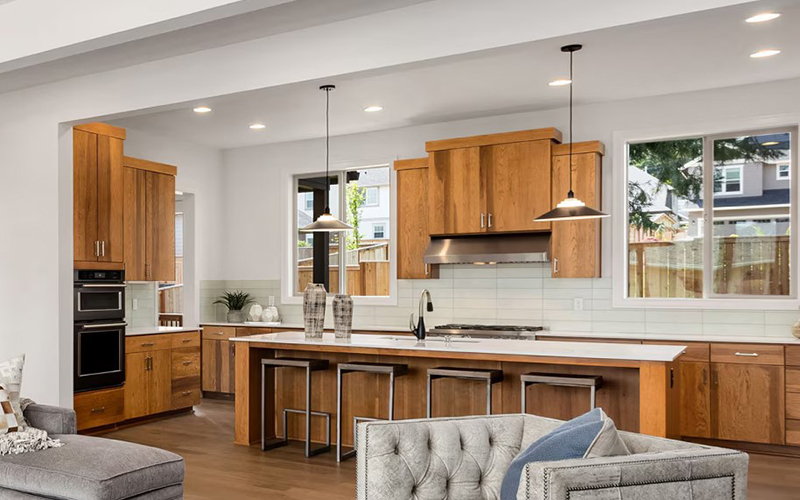
Kitchen Can Light Layout
The kitchen is a task-heavy area – chopping, cooking, and cleaning all require excellent visibility. That’s why the kitchen can light layout focuses on functionality above all.
- Use recessed lights spaced 3–4 feet apart in work zones (sink, countertops, stove).
- For kitchen islands, pair 2–3 recessed lights with pendant lighting above.
- Place lights slightly in front of you (not directly behind) to prevent casting shadows on the workspace.
- Avoid installing lights over cabinet tops – you’ll only light up closed doors.
If your kitchen opens into the living or dining area, make sure the lighting transitions smoothly using consistent spacing and light color.
Dining Room Recessed Lighting Layout
The dining room benefits from a combination of central focal lighting (like a chandelier or pendant) and subtle recessed lighting to enhance mood and visibility.
- Place recessed lights around the perimeter of the room or evenly spaced outside the dining table area.
- Avoid placing cans directly above the table – that’s what your main fixture is for.
- Use dimmers to soften the lighting during meals and enhance ambiance.
Recessed lighting here should support the main light source, not compete with it.

Basement Recessed Lighting Layout
Basements tend to have lower ceilings and little to no natural light, making recessed lights a perfect fit.
- Use canless LED recessed lights to save ceiling space.
- Lights should be spaced closer together – about 3–4 feet apart – to ensure full coverage.
- Consider a grid pattern to evenly light the entire area, especially in finished basements used as living rooms or home gyms.
- In darker corners or entertainment areas, add accent lighting to avoid a “flat” look.
💡 Pro Tip: If you’re planning a basement recessed lighting layout, account for ceiling obstructions like ductwork or beams.
Tools & Tips for Planning Your Recessed Lighting Layout
Designing the perfect recessed lighting layout doesn’t have to be overwhelming – especially if you have the right tools and a few smart strategies. Whether you’re doing a full home renovation or simply adding new lights to one room, these practical tips will help you plan with confidence.
Use Digital Tools to Visualize Your Layout
Before you start cutting holes in your ceiling, it’s a great idea to plan everything virtually. Here are a few helpful tools:
- RoomSketcher – A beginner-friendly app to sketch room layouts and furniture placement.
- Dialux – A professional lighting design software (free) that calculates brightness and light distribution.
- Graph paper – Old-school, but still effective for sketching light positions and measuring spacing.
💡 Tip: Print your floor plan, then draw in your recessed light positions based on spacing rules (ceiling height ÷ 2, and 2–3 feet from walls).
Sketch Around Furniture and Focal Points
When planning your layout, take your room’s furniture into account:
- For the living room, consider where the couch, TV, or fireplace will go.
- In the bedroom, avoid placing lights directly above the bed or dresser.
- For a kitchen layout, mark countertops and the island on your sketch.
This ensures that light is focused where it’s needed – without casting awkward shadows over key spaces.
Choose the Right Type of Recessed Lights
Different spaces and ceilings call for different types of fixtures:
- Canless LED recessed lights: Great for shallow ceilings, basements, or retrofits.
- Gimbal or directional lights: Perfect for highlighting artwork or angled ceilings.
- IC-rated fixtures: Required for insulated ceilings.
- Wet/damp-rated lights: Must-haves for bathrooms and showers.
The right fixture can simplify installation and improve both light quality and safety.
Plan for Lighting Layers
Instead of relying only on recessed lighting for everything, use it as one layer in your lighting plan:
- Ambient layer: General recessed lighting spaced evenly.
- Task layer: Focused cans above islands, vanities, desks, or reading areas.
- Accent layer: Aim gimbal lights at artwork or textured walls.
Layering creates depth and allows for more control over brightness in different situations.
Don’t Forget Dimmer Switches and Smart Controls
- Install dimmers in living rooms, dining rooms, and bedrooms to adjust the atmosphere.
- Use smart switches or bulbs for hands-free voice control or scheduling via phone apps.
- Consider motion sensors in hallways or basements to save energy.
Lighting is not just about brightness – it’s about flexibility and comfort too.
Prevention Tip: Avoid Common Planning Pitfalls
Even with great tools, layout mistakes happen. Avoid these common errors:
- Placing lights too far apart or too close to walls
- Forgetting to account for ceiling joists or HVAC ducts
- Using too few lights in larger rooms (especially basements)
- Skipping dimmers or smart controls for flexibility
Taking the time to plan carefully can save you time, money, and regret later on.

Common Recessed Lighting Layout Mistakes to Avoid
Even with the best intentions, it’s easy to make layout mistakes that lead to poor lighting performance – or costly fixes. Whether you’re designing for a kitchen, living room, or small bathroom, here are the most common recessed lighting layout errors homeowners make – and how to avoid them.
1. Placing Lights Too Far Apart (or Too Close Together)
One of the most frequent layout issues is improper spacing.
- Lights placed too far apart can leave dark zones or shadows, especially in kitchens and basements.
- Too many lights packed too close together can make a room feel clinical or overexposed.
Fix it: Use the ceiling height ÷ 2 rule for general spacing. For example, on an 8-foot ceiling, lights should be spaced around 4 feet apart. Adjust slightly for room size and purpose.
2. Installing Recessed Lights Too Close to the Walls
Many homeowners mistakenly install recessed lights too close to room edges, trying to brighten the walls. Unfortunately, this often creates harsh vertical shadows or uneven lighting.
Fix it: Keep lights 2 to 3 feet away from the walls. If you need to highlight artwork or a specific wall surface, use adjustable (gimbal) fixtures instead.
3. Poor Placement in Kitchens and Bathrooms
Task lighting matters – and nowhere more than the kitchen and bathroom. Misplaced lights in these rooms can lead to frustrating shadows or unsafe conditions.
- In the kitchen, don’t install lights behind where you’ll be standing. This creates shadows on your work surfaces.
- In the bathroom, a single light directly over the vanity can cast unflattering shadows on your face.
Fix it:
- For placement of can lights in kitchen, install lights slightly in front of counters and sinks, spaced 2–3 feet apart.
- For recessed lighting placement over bathroom vanity, place two lights evenly spaced on either side of the mirror, or supplement with sconces for balance.
4. Using the Wrong Type of Fixture
Not all recessed lights are created equal. Choosing the wrong type for your space can lead to moisture problems, fire hazards, or poor performance.
Fix it:
- Use IC-rated fixtures for insulated ceilings.
- Use damp- or wet-rated fixtures in bathrooms and laundry areas.
- In basements or low ceilings, opt for canless LED fixtures to maximize space and ease of installation.
5. Relying on Recessed Lights Alone
Recessed lights provide great ambient lighting, but they shouldn’t be your only source. Rooms with only recessed lights can feel flat or lack visual warmth.
Fix it: Layer your lighting:
- Add pendant lights in the kitchen or dining area.
- Use lamps or wall sconces in bedrooms and living rooms.
- Consider smart bulbs or dimmers to add flexibility and depth to your lighting scheme.
6. Forgetting to Plan for Obstructions
Don’t overlook what’s behind the ceiling. Structural elements like joists, ductwork, or pipes can interfere with your lighting layout.
Fix it: Use a stud finder or consult your contractor to mark obstructions before cutting. You may need to slightly shift light positions or use compact fixtures to work around obstacles.
By avoiding these common mistakes, you’ll save yourself from uneven lighting, poor performance, and unnecessary repairs later. Up next: we’ll walk through a 10-step checklist to help you plan your recessed lighting layout like a pro – from start to finish.

DIY vs. Hiring a Pro: What’s the Right Move for Your Layout?
If you’re handy around the house, you might be tempted to plan and install your recessed lighting layout yourself. And in some cases, that’s totally doable. But depending on your ceiling type, electrical knowledge, and the complexity of your project, hiring a licensed electrician may be the smarter – and safer – choice.
Here’s how to decide:
When You Can DIY Your Recessed Lighting Layout
You may be able to tackle the planning and installation yourself if:
- You’re replacing existing recessed lights (swapping old fixtures for new LED ones)
- You’re installing a small number of lights (2–4 lights in a bedroom or hallway)
- Your ceiling is accessible from above (e.g., attic access or open basement ceiling)
- You have basic electrical knowledge and know how to work safely with wiring
- You’ve planned the layout carefully, and there are no major obstructions
Even with DIY, you’ll still want to check local building codes and make sure your setup is compliant – especially when it comes to bathroom or kitchen lighting.
Pro Tip: Many homeowners sketch the layout themselves and then hire a pro for the actual install.
When You Should Hire a Licensed Electrician
Professional help is a must when:
- You’re installing more than 4–6 lights or wiring from scratch
- The layout requires new switches or dimmers
- You have insulated ceilings, sloped ceilings, or limited access from above
- You need to pull permits in your city or state (required in many areas)
- You want to integrate smart lighting systems with your home network
An electrician will help ensure the placement is accurate, the wiring is safe, and the fixtures are rated properly for each room.
How Much Does Recessed Lighting Installation Cost?
Here’s a general idea of what to expect in the U.S.:
| Installation Type | Estimated Cost (Per Fixture) |
|---|---|
| DIY (materials only) | $30 – $80 |
| Electrician (labor + materials) | $150 – $300 |
| Retrofit install (existing ceilings) | $200 – $350 |
Factors that affect cost:
- Number of fixtures
- Ceiling accessibility (retrofit vs. new construction)
- Location (labor costs vary by region)
- Type of fixtures (smart, dimmable, IC-rated, etc.)
In short, if you’re confident and prepared, small-scale recessed lighting projects can be a great DIY opportunity. But if you’re doing a full room or a new layout with electrical rewiring, call in a pro – you’ll thank yourself later.
Next up: a simple, step-by-step checklist to guide you through the planning process from start to finish.
10-Step Checklist for Planning Your Recessed Lighting Layout
Whether you’re lighting a kitchen, bedroom, or basement, planning your recessed lighting layout doesn’t have to be complicated. Use this step-by-step checklist to stay organized and avoid costly mistakes.
Step 1: Define the Room’s Purpose
Decide how the space will be used – cooking, reading, relaxing, working, entertaining?
This determines whether you need ambient, task, or accent lighting (or all three).
Step 2: Measure Room Dimensions and Ceiling Height
Write down the length, width, and ceiling height.
You’ll use these numbers to calculate spacing between lights.
Step 3: Mark Furniture and Key Features
Sketch a floor plan and include:
- Furniture (sofas, beds, tables, vanities)
- Appliances (fridge, range, sink)
- Focal points (TV, fireplace, artwork)
This helps avoid placing lights directly over beds or behind your prep area in the kitchen.
Step 4: Choose the Right Fixtures
Pick your recessed light type based on the room:
- Canless LEDs for tight spaces or low ceilings
- IC-rated lights for insulated ceilings
- Damp/wet-rated for bathrooms
- Gimbal fixtures for directional accent lighting
Step 5: Determine How Many Lights You Need
Apply the ceiling height ÷ 2 rule:
- 8 ft ceiling → lights ~4 ft apart
- 10 ft ceiling → lights ~5 ft apart
This ensures consistent brightness with overlapping coverage.
Step 6: Create Your Lighting Layout
Draw out a grid or pattern based on the spacing.
Avoid placing lights too close to walls (stay 2–3 feet away).
Adjust spacing near cabinets, beams, or architectural details.
Step 7: Identify Lighting Zones
Break the room into lighting types:
- Ambient: grid of evenly spaced lights
- Task: extra lights above countertops, vanities, or desks
- Accent: directional lights aimed at décor or feature walls
Step 8: Plan for Switches, Dimmers, and Controls
Decide how you’ll control the lights:
- Dimmers for mood lighting
- Motion sensors for hallways or garages
- Smart controls for scheduling or voice activation
Group lights into logical zones so you don’t need to turn everything on at once.
Step 9: Check for Obstructions in the Ceiling
Use a stud finder or ask your contractor to locate:
- Joists
- HVAC ducts
- Plumbing
- Existing wiring
Shift your layout slightly if needed to avoid these obstacles.
Step 10: Final Review Before You Cut
Double-check everything:
- Is your spacing even?
- Are fixtures rated for the room’s conditions?
- Do switches and zones make sense?
- Are you following local building codes?
Once you’re confident, mark your locations – and you’re ready to start cutting or call in the pros.
Final Thoughts
Designing the right recessed lighting layout takes a bit of planning, but the results are worth it: brighter spaces, better functionality, and a more comfortable home. Whether you’re updating your kitchen can light layout, optimizing your bathroom vanity lighting, or illuminating a cozy living room or basement, the right placement makes all the difference.
But lighting isn’t just about functionality – it’s also about atmosphere. If you’re looking to add warmth, texture, and a handcrafted touch to your space, consider complementing your recessed lighting with natural, artisan-made pendant lights.
👉 Explore our handcrafted rattan and bamboo light fixtures at vietshopdesign.com – sustainably made in Vietnam, designed to bring calm, character, and organic beauty into modern homes.
Light with intention. Decorate with soul.


Unlock VIP Perks
Join as a priority member to receive gifts and be the first to access exclusive deals, our newest collections, and more...
Read More
10 Best Bamboo Rattan Furniture Ideas for your Home
In a world increasingly focused on sustainability and wellness, bamboo rattan furniture has found its [...]
Jul
Recessed Lighting Layout Guide: Room-by-Room Tips & Ideas
Whether you’re remodeling a kitchen, updating your bathroom, or designing a cozy basement retreat, a [...]
Jun
Recessed Lighting Installation Cost in 2025: Money-Saving Tips
Recessed lighting installation cost is one of the first things homeowners consider when planning to [...]
Jun
How to Change Recessed Lighting: Step-by-Step Guide
Recessed lighting – often referred to as can lights, pot lights, or downlights – is [...]
Jun
How Many Recessed Lights Do I Need? Expert Guide to Perfect Lighting Layout
One of the most common questions homeowners ask when planning lighting is: “How many recessed [...]
Jun
How to Install Recessed Lighting: Everything You Need to Know
How to Install Recessed Lighting is a common question among homeowners looking to upgrade their [...]
Jun
Best Bathroom Pendant Light Ideas to Elevate Your Space
When it comes to bathroom design, lighting plays a crucial role in setting the mood, [...]
Jun
Best Hotel Lighting Ideas That Will Wow Your Guests
Lighting plays a vital role in shaping the guest experience in any hospitality setting. From [...]
Jun
Product Collection
Rattan Pendant Light
86 Products
Bamboo Pendant Light
56 Products
Fabric Pendant Light
44 Products
Wood Pendant Light
9 Products
Rope Pendant Light
8 Products
Rattan Table Lamp
6 Products
Wabi Sabi Pendant Light
39 Products
Rattan Wall Sconce
5 Products